
It’s Pinterest Challenge Day! Woo hoo! This month we challenged ourselves to recreate the inspiration photo and kept in mind our style and what worked best for us. I decided to do a DIY rustic cut branch table centerpiece idea. It was super easy and with only a small change, it will be perfect for the holidays too.

If you’ve hopped over from Decor To Adore, welcome, I’m glad you’re here! Hopefully you can stay a while and find lots of other inspiration from my blog. I love all things home decorating. Especially on a budget.
A DIY Rustic Cut Branch Table Centerpiece Idea
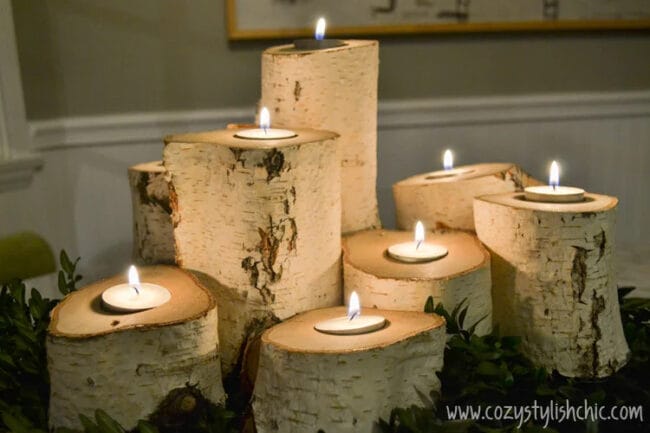
The inspiration photo above came from Jeanne at Cozy, Stylish & Chic. She crated a pretty table centerpiece using Birchwood. My only problem is that we don’t have those trees around where I live. Trying to figure out what I could do instead, here’s what I saw and decided to incorporate.
- Cut wood branches from the yard
- Tealights
- Greenery around the base of log pieces
- And then figure out how to add more white to the cut branches
 Steps to making the rustic cut branch candle holder centerpiece
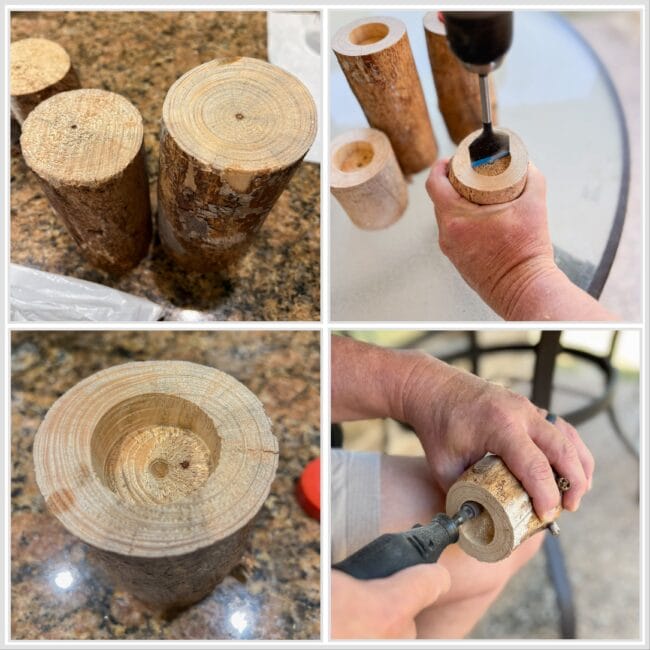
Of course you can make these by yourself unless the dude in your life is particular when lending out his tools. But here’s what you’ll need. A circular saw, a drill, a 1-1/2″ woodboring spade drill bit (that is the diameter of a tealight) and a Dremel (totally optional).
Step One: The Mister went out back, picked up a pine branch and used the circular saw to cut 5 pieces to the sizes I requested. Roughly 4″, 5-1/2″, 6-1/2″, 8″ and 10″. I always prefer to use an odd number for groupings of anything.
Step Two: He used the woodboring spade drill bit to make the hole for the tealight. You can eyeball it to find the center or you can measure to get the middle. My motto is always “good enough” so you know we eyeballed it. 😉
Our particular branch didn’t have any bark left on it. If it had, I would have used a flathead screwdriver to chip it off. That is just a personal preference. I didn’t want any hidden bugs. Especially since they are on an inside table.
That’s it folks! Seriously so easy!
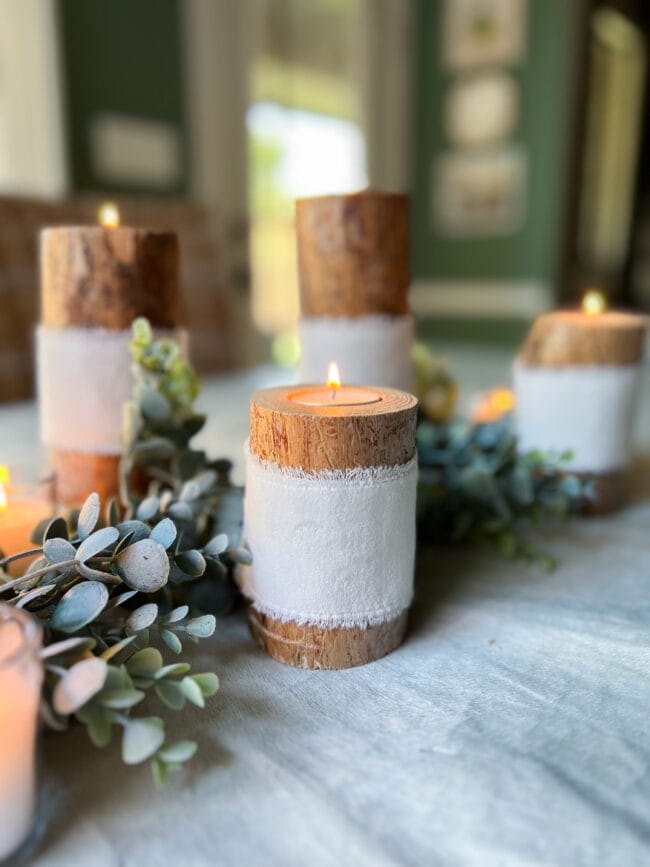
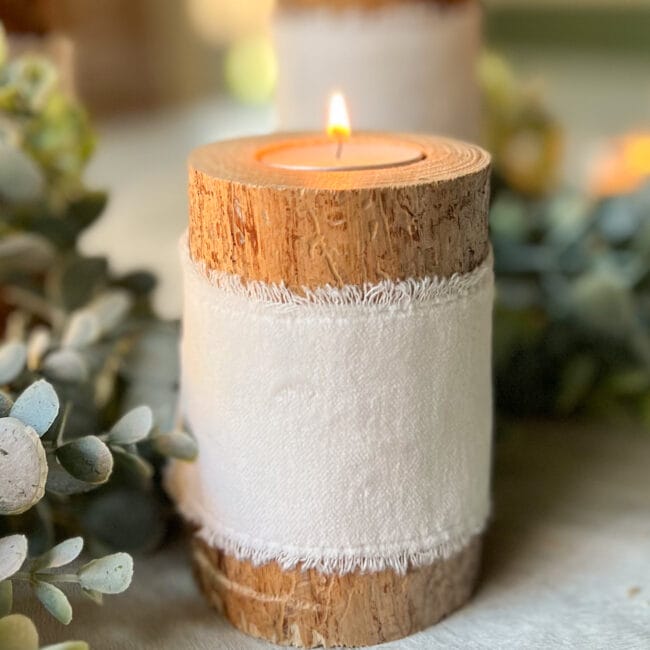
I love the warm color of the pine branch but since the inspiration photo was of birchwood, which was basically white, I added white velvet ribbon that was adhered with double sided tape. Hot glue would have worked too.
They are fairly smooth and easy to work with. So if you wanted to paint the outside white, that’s easily done. The paint will soak into the wood so plan for multiple coats.
You could also buy birchwood scrapbook paper and simply wrap it around your log pieces. I did that years ago (so if you click over, no laughing) with some chipped candles and they turned out great!

I have a short piece of faux boxwood garland I was able to weave in between the logs to mimic the greenery Jeanne used. And during the evening it was so nice to see everything together with the candles lit.
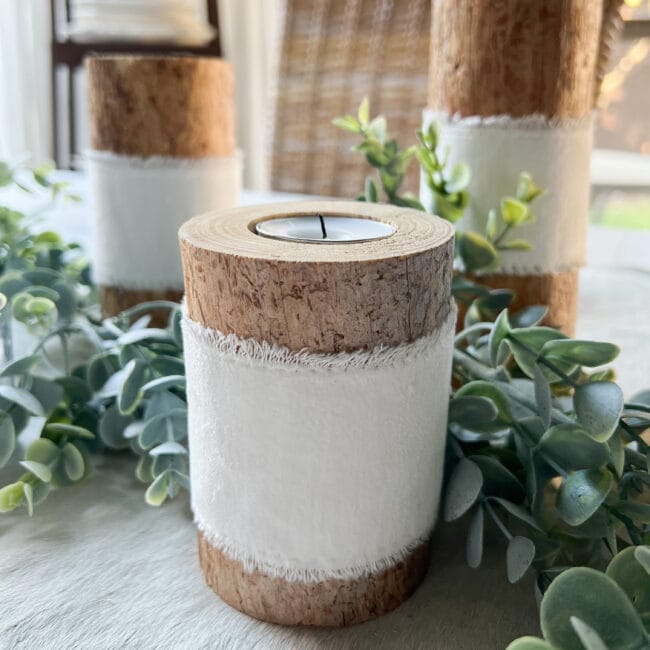
 Rustic Cut Branch Table Centerpiece
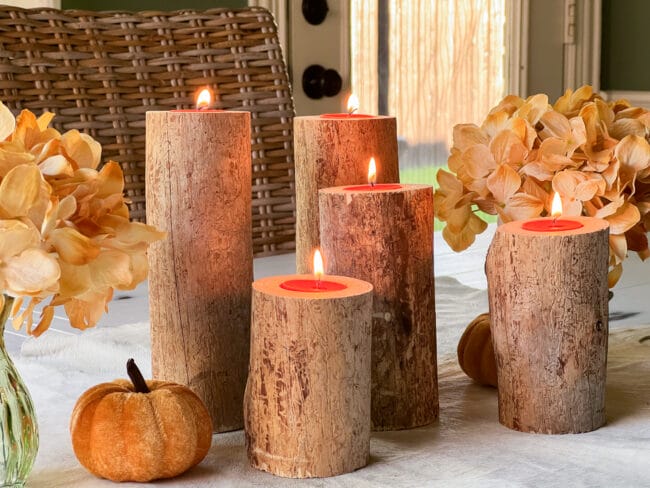
Seasonal Ideas:
It’s super easy to switch things up for a seasonal look. I added orange tea lights for fall and removed the white ribbon. You could always add autumn colored ribbon, jute twine, or grapevine around the middle too.
For Christmas you could switch the faux boxwood greenery with cedar or fir stems and add a few pinecones or berries. That would look amazing! And what about red or green tealights? Green or red velvet ribbon too.
Ooo, what about doing an all green, black and white centerpiece? Black ribbon around the middle of the cut wood pieces would look stunning. The juxtaposition between the rustic wood and the elegant ribbon is right up my alley.
I hope you can see how using one inspiration photo found on Pinterest and changing it just a teeny bit to fit your own home decorating style is easy and very doable. If you have any questions, just ask, I’m happy to help.
Now it’s time to look at DIY Beautify to see what she did. Then don’t forget to check out the rest of what my friends came up with. Each one is fabulous!

this looks great cindy! Pinned!
Author
Thank you so much Laura! How are you?!
Ooo I’m loving the look of the pine instead of birch! I’m also admiring the white ribbon, which is such an elegant addition. So smart to use tape so you can change it up on a whim. So pretty Cindy! Pinning!
Author
I love that ribbon and have it in all the sizes and in all the colors! LOL. I know a lot of us are drawn to it. It’s beautiful. Thanks for the pin and sweet comment.
Love the idea of wrapping the branches! It adds another level of visual texture. Thank you so much for hosting! I will be featuring one of the images on my IG stories.
Author
Thank you Laura. I didn’t want to paint them because my family thinks I have to many things in white already. :/
I love your pretty centerpiece. Your ideas and ways to change it up are wonderful. Thanks for the inspiration.
Author
Thank you Marlene. I’ve been lighting the candles every day. It’s so nice!
Love the idea of wrapping them with fabric or ribbon to switch things up seasonally. Having a grouping of these are a great flexible decor item to have handy. I’m cracking up…guess I don’t worry about bugs; I have enough in this old farmhouse already…we cohabitate pretty easily;)
Author
Oh my, there will be no cohabitating around here! I’ve brought in a few in my day and they seem to duplicate quickly so I’ve trained myself to check or soak things in bleach or some other concoction. I can’t do it!
I like being able to use things all year round. I could probably open my own ribbon store by now. :0 Thanks bunches Lora!
Your wood branch candles turned out so good Cindy! I love the white velvet, adds such a warm touch! These will be great to display all the way through winter! Pinned.
Author
I thought so too and I was surprised at how easy they were to make. The mister did them all in less than 10 min. Thanks so much Cindy!
Cindy
Your candleholders turned out so cute. I love the ribbon addition.
Author
Thanks so much Rachel. I seem to add ribbon to most things around here. I think Hobby Lobby knows me by name now in the fabric department. LOL
Don’t forget to join us over at the Creatively Crafty Linky Party every Wednesday through Sunday
https://creativelybeth.com/creative-crafts-linky-party/
Followed and Pinned!
Creatively, Beth
You make it look so easy! I would love to do this for our dining room centerpiece. Maybe I can convince my husband to help me this weekend haha.
Author
I promise it was easy! Hope you get to make some too. Thank you Jackie.
Amazing, would have to get my SIL to make me some
Thank you for popping over and for participating and sharing at SSPS 333. See you again next week at #334
Author
I light ours all the time. We love them. Hope you do too! Thank you.
Popping in quickly to let you know that your awesome post will be featured Monday at SSPS 333 https://esmesalon.com/tag/seniorsalonpitstop/
Author
Oh wow, thank you! What an honor. I appreciate it so much. Have a great week!
This is just stunning Cindy. I love the simplicity. I’m excited to share it in my weekly recap post today.
Author
You are the bestest! Thank you